项目初衷
开发不能失去GitLab,就像西方不能失去耶路撒冷
—— bash 水清
GitLab作为日常开发过程中代码存放、项目管理、版本迭代等必不可少的一个代码管理平台,本文主要着重赘述GitLab的搭建过程,以及其使用方法,最后的最后未日后WebHook埋坑。
GitLab渗透使用计划:
本文完成度:
GitLab搭建
1
2
3
4
5
6
7
8
9
| 本人试验环境:
搭建环境:Ubuntu
虚拟机配置:2p、4c、8g
官方推荐环境:
建议ram:4g
最低要求参考:https://docs.gitlab.com/ee/install/requirements.html
|
本人使用Ubuntu 20来进行GitLab搭建,其实GitLab的搭建已经很成熟,只需要安装相关依赖,添加仓库,正常安装即可
1
2
3
4
5
6
7
8
9
10
11
12
13
14
15
16
17
18
19
20
21
22
23
24
25
| // 不过在此之前,先配置一个Ubuntu源
sudo vim/etc/apt/sources.list
// 配置内容如下
deb http://mirrors.aliyun.com/ubuntu/ focal main restricted universe multiverse
deb http://mirrors.aliyun.com/ubuntu/ focal-security main restricted universe multiverse
deb http://mirrors.aliyun.com/ubuntu/ focal-updates main restricted universe multiverse
deb http://mirrors.aliyun.com/ubuntu/ focal-proposed main restricted universe multiverse
deb http://mirrors.aliyun.com/ubuntu/ focal-backports main restricted universe multiverse
deb-src http://mirrors.aliyun.com/ubuntu/ focal main restricted universe multiverse
deb-src http://mirrors.aliyun.com/ubuntu/ focal-security main restricted universe multiverse
deb-src http://mirrors.aliyun.com/ubuntu/ focal-updates main restricted universe multiverse
deb-src http://mirrors.aliyun.com/ubuntu/ focal-proposed main restricted universe multiverse
deb-src http://mirrors.aliyun.com/ubuntu/ focal-backports main restricted universe multiverse focal
|
1
2
3
4
5
6
7
8
9
10
11
12
13
14
15
16
| // 初始环境配置
sudo apt-get update
sudo apt-get install -y curl openssh-server ca-certificates tzdata perl
// 邮件服务器配置 - 可跳过
sudo apt-get install -y postfix
// GitLab install
curl https://packages.gitlab.com/install/repositories/gitlab/gitlab-ee/script.deb.sh | sudo bash
// 初始化配置,Nginx域配置
sudo EXTERNAL_URL="https://gitlab.example.com" apt-get install gitlab-ee
|
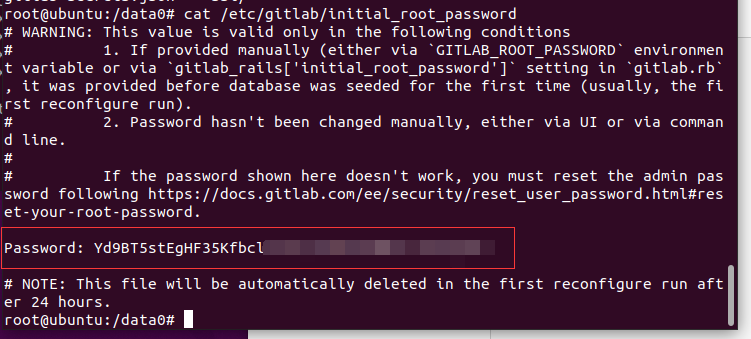
完成测试
依据上述命令自上而下执行即可,邮件服务器可跳过配置,着重注意一点就是最后配置初始化时,如果超时配置root密码,那么GitLab会自动配置一个初始化的密码,并存储在/etc/gitlab/initial_root_password文件中,如下图所示
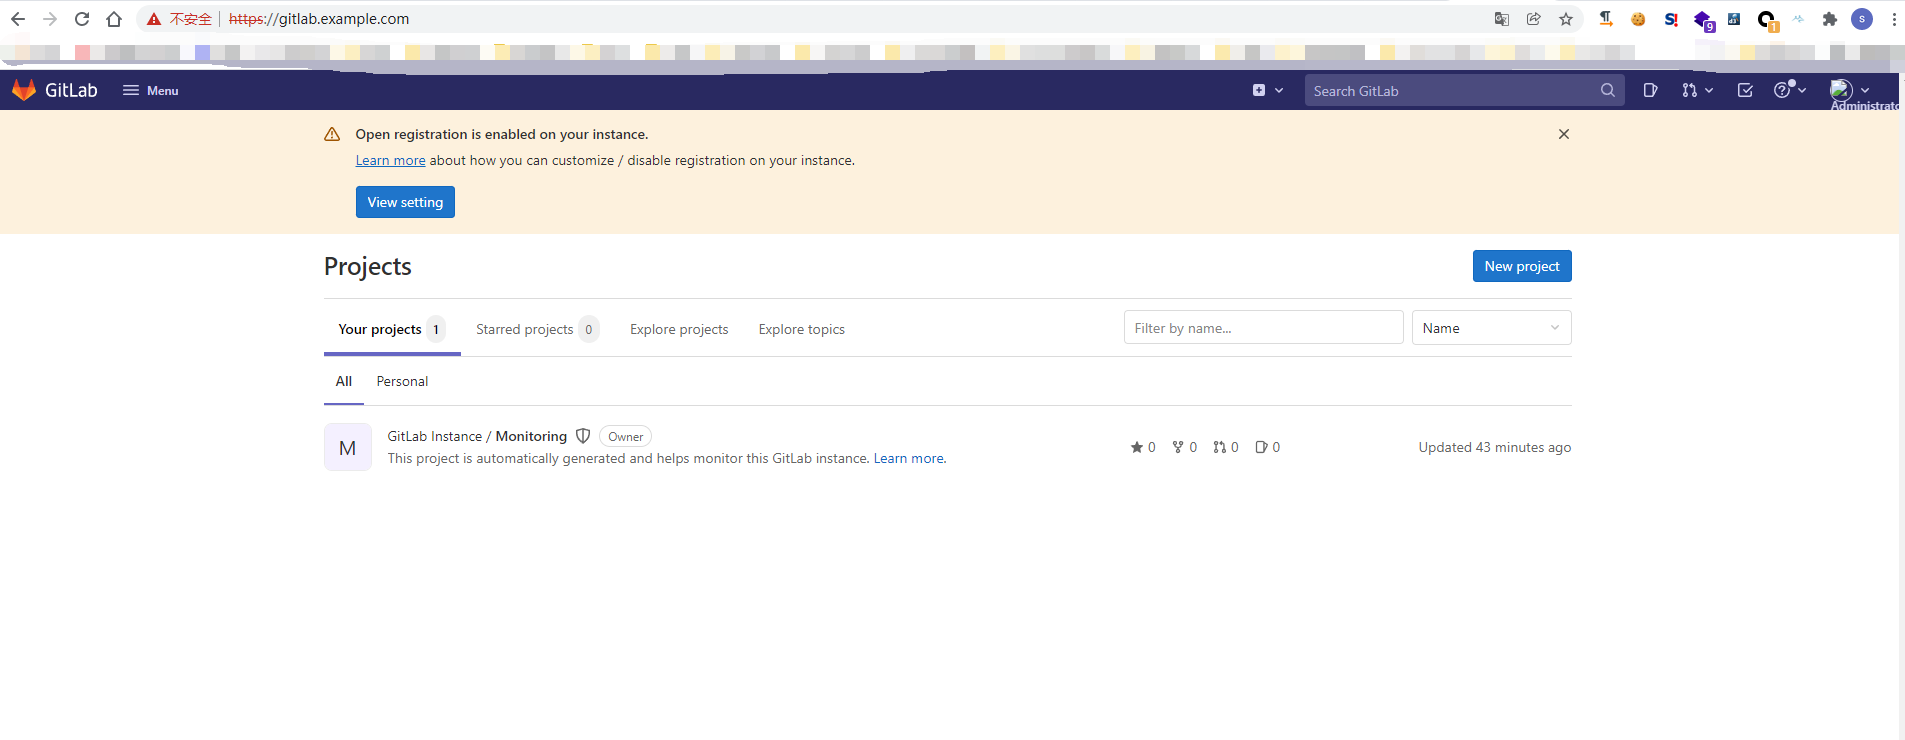
安装完成后,由于使用了Nginx来转出域名,所以需要配置dns来进行域名的访问
- windows:C:\Windows\System32\drivers\etc
- Linux / mocos:/etc/hosts
搭建完成后,只需要访问服务器的ip或者域名即可,如下图所示
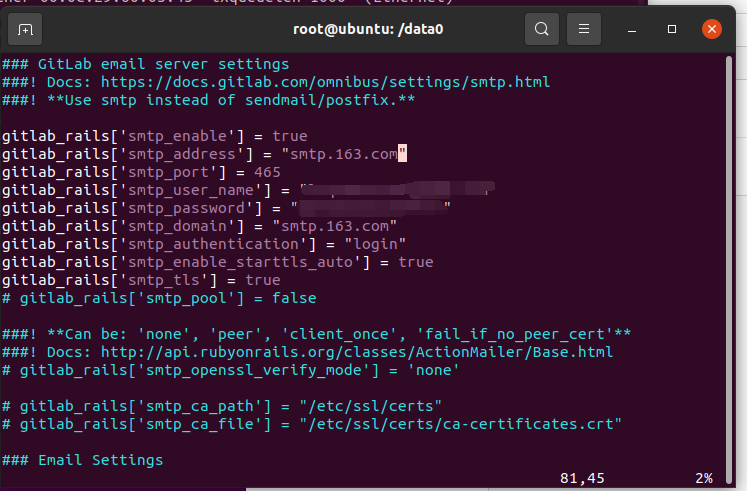
邮件设置
修改配置问题/etc/gitlab/gitlab.rb
1
2
3
4
5
6
7
8
9
10
11
| gitlab_rails['smtp_enable'] = true
gitlab_rails['smtp_address'] = "smtp.163.com"
gitlab_rails['smtp_port'] = 465
gitlab_rails['smtp_user_name'] = "lsq402287297@163.com"
gitlab_rails['smtp_password'] = "EMAKHCNUEKFMMGOL"
gitlab_rails['smtp_domain'] = "smtp.163.com"
gitlab_rails['smtp_authentication'] = "login"
gitlab_rails['smtp_enable_starttls_auto'] = true
gitlab_rails['smtp_tls'] = true
gitlab_rails['gitlab_email_from'] = 'lsq402287297@163.com'
|
配置完成后,只需要执行如下命令即可
1
2
3
4
5
6
7
8
9
| // 更新配置
gitlab-ctl reconfigure
// 使用控制模板
gitlab-rails console
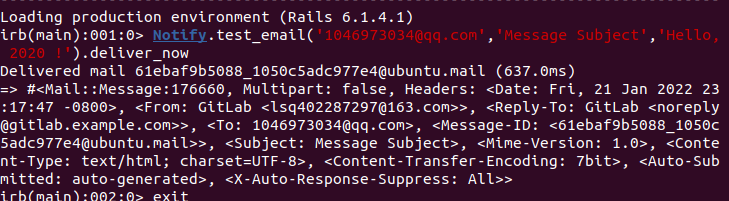
// 邮件测试
001:0> Notify.test_email('邮件地址','Message Subject','Hello,
2020 !').deliver_now
|
测试邮件过程中,可能会出现权限错误的情况
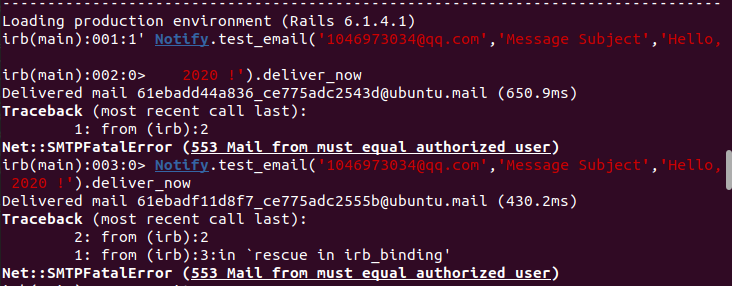
此类错误有俩种情况
- 邮箱授权码错误,注意填写的是授权码,而非密码
- 发送邮箱没有更改,gitlab.rb文件中,修改“gitlab_email_from”字段为自己的现有邮箱即可
邮件成功发送如下图所示
https设置
由于上述使用的HTTPS的请求服务,那么无论是chome还是firefox等浏览器,都会判定不安全的访问访问模式,此时,只需要生成 .key、.crt即可
参考文档:
外网
博客园
用户与组设置
用户和组的创建此处就不做赘述,主要说明组内用户的权限
1
2
3
4
5
| Guest:可以创建issue,发表评论,不能读写版本库
Reporter:可以克隆代码,不能提交,QA、PM可以赋予这个权限
Developer:可以克隆代码,开发,提交,push,普通开发可以授予该权限
Maintainer:可以创建项目,添加tag,保护分支,添加项目成员,编辑项目,核心开发可以授予该权限
Owner:可以设置值项目访问权限,Visibility Level,删除项目,迁移项目,管理组成员,开发组组长可以授予该权限
|
将用户添加到组后,默认赋予的权限是Guest,也就是可创建issues,但是不可读写

但是如果想让其具备一定权限,需要修改为上述所描述的权限
GitLab使用
搭建完成后,就开始GitLab的基本使用操作
服务端基本操作
GitLab的文件基础设置基本都在/etc/gitlab/gitlab.rb该文件中进行配置
GitLab的其他敏感路劲
1
2
3
4
5
| 主配置文件: /etc/gitlab/gitlab.rb
GitLab 文档根目录: /opt/gitlab
默认存储库位置: /var/opt/gitlab/git-data/repositories
GitLab Nginx 配置文件路径: /var/opt/gitlab/nginx/conf/gitlab-http.conf
Postgresql 数据目录: /var/opt/gitlab/postgresql/data
|
GitLab服务管理命令
1
2
3
4
5
6
7
8
9
10
11
12
13
14
15
16
17
| # 启动所有 gitlab 组件:
gitlab-ctl start
# 停止所有 gitlab 组件:
gitlab-ctl stop
# 停止所有 gitlab postgresql 组件:
gitlab-ctl stop postgresql
# 停止相关数据连接服务
gitlab-ctl stop unicorn
gitlab-ctl stop sidekiq
# 重启所有 gitlab 组件:
gitlab-ctl restart
# 重启所有 gitlab gitlab-workhorse 组件:
gitlab-ctl restart gitlab-workhorse
# 查看服务状态
gitlab-ctl status
# 生成配置并启动服务
gitlab-ctl reconfigure
|
客户端操作
简单的project创建以及group创建就不一一赘述,此处重点说明一些bash命令行的操作
ssh配置
Git操作最优解是ssh的连接方式,但是由于时间问题,此处挖坑,后续填写
Git基本操作
1
2
3
4
5
6
7
8
| // 创建一个仓库后
git clone git@xxx.git
cd xxx
touch README.md
git add README.md
git commit -m "add README"
git push -u origin master
|
1
2
3
4
5
6
7
| // 向目标push一个已经存在的文件
cd existing_folder
git init
git remote add origin git@gitlab.verify.com:hongmengOS/hm-verify-kernel.git
git add .
git commit -m "Initial commit"
git push -u origin master
|
Git Tag版本控制
版本控制绝对是Git最爽的地方,从此不用害怕版本迭代什么造成的之前代码丢失
1
2
3
4
5
6
7
| git tag -a -m "tag version 1.0" version1.0
git push origin --tags
git tag -d xxx
git push origin :refs/tags/xxx
|
挖坑
后续还有其他的Git操作,陆续更新此文档
参考文献
GitLab install
GitLab install by Ubuntu
GitLab 基本配置