项目初衷 正如标题看到的那样,本文所提到的技术均由于诸多原因未能实现其目的,所以您可以理解为这是一篇对于古早bypass技术的探究,亦或者是初入android内核小白的自我摸索之旅。
最初的目的是想要修改android kernel 的方式实现bypass root检测、frida检测,但是由于技术陈旧亦或者对kernel不熟悉,导致了诸多问题,这个最后会在文末做一一汇总
tracePid 修改 *注:此项修改只适用于kernel 3+,且已经属于弃用的绕过手段,此处也只做记录学习;实战环境中此方案无法绕过frida的检测
Linux文件 /proc/[pid]/wchan ,显示进程sleep时,kernel当前运行的函数;调试状态下,wchan文件会显示ptrace_stop
/proc/[pid]/cmdline ,文件存放进程的命令内容;使用GDB这类的调试器时,调试会fork一个子进程,然后执行ELF程序;此时,ELF文件就可以通过getppid()获取父进程pid,然后检测cmdline中是否存在gdb关键字,来判断程序的调试状态。
/proc/[pid]/stat ,文件包含对应进程的状态信息,主要用于ps命令。此文件由kernel源文件kernel/msm/fs/proc/array.c定义。当进程处于调试状态时,在stat文件的第三个字段处,会显示小写t,表示Tracing stop.(适用于Linux 2.6.33之后,也就是Android 2.3.x之后的版本)
/proc/[pid]/statm ,该文件包含对应进程的页面内存状态信息。
/proc/[pid]/status ,文件是/proc/[pid]/stat和/proc/[pid]statm两文件的集合,更易阅读。status文件除了TracerPid字段外,第二行的state字段也能够用来判断进程是否处于被调试状态(Tracing stop)
反调试相关的文件除了/proc/[pid]目录,在/proc/[pid]/task/tid/目录下应该有线程的状态信息文件,同样可以用来做反调试检测
bypass原理 基本原则是修改array.c、base.c绕过检测TracerPid、State的反调试
kernel 差异 kernel 3.* 与 kernel 4.* 修改上存在明显的差异,下方列举了修改tracePid时,kernel不同版本的差异性
fs/proc/array.c kernel 4.9 task_state 函数构造如下
1
2
3
4
5
6
7
8
9
10
11
12
13
14
15
16
17
18
19
20
21
22
23
24
25
26
27
28
29
30
31
32
33
34
35
36
37
38
39
40
41
42
43
44
45
46
47
48
49
50
51
52
53
54
55
56
57
58
59
60
61
62
63
64
65
66
67
68
69
70
71
72
73
74
75
static inline void task_state (struct seq_file *m, struct pid_namespace *ns, struct pid *pid, struct task_struct *p) struct user_namespace *user_ns = struct group_info *group_info ; int g, umask; struct task_struct *tracer ; const struct cred *cred ; pid_t ppid, tpid = 0 , tgid, ngid; unsigned int max_fds = 0 ; rcu_read_lock(); ppid = pid_alive(p) ? task_tgid_nr_ns(rcu_dereference(p->real_parent), ns) : 0 ; tracer = ptrace_parent(p); if (tracer) tpid = task_pid_nr_ns(tracer, ns); tgid = task_tgid_nr_ns(p, ns); ngid = task_numa_group_id(p); cred = get_task_cred(p); umask = get_task_umask(p); if (umask >= 0 ) seq_printf(m, "Umask:\t%#04o\n" , umask); task_lock(p); if (p->files) max_fds = files_fdtable(p->files)->max_fds; task_unlock(p); rcu_read_unlock(); seq_printf(m, "State:\t%s" , get_task_state(p)); seq_put_decimal_ull(m, "\nTgid:\t" , tgid); seq_put_decimal_ull(m, "\nNgid:\t" , ngid); seq_put_decimal_ull(m, "\nPid:\t" , pid_nr_ns(pid, ns)); seq_put_decimal_ull(m, "\nPPid:\t" , ppid); seq_put_decimal_ull(m, "\nTracerPid:\t" , tpid); seq_put_decimal_ull(m, "\nUid:\t" , from_kuid_munged(user_ns, cred->uid)); seq_put_decimal_ull(m, "\t" , from_kuid_munged(user_ns, cred->euid)); seq_put_decimal_ull(m, "\t" , from_kuid_munged(user_ns, cred->suid)); seq_put_decimal_ull(m, "\t" , from_kuid_munged(user_ns, cred->fsuid)); seq_put_decimal_ull(m, "\nGid:\t" , from_kgid_munged(user_ns, cred->gid)); seq_put_decimal_ull(m, "\t" , from_kgid_munged(user_ns, cred->egid)); seq_put_decimal_ull(m, "\t" , from_kgid_munged(user_ns, cred->sgid)); seq_put_decimal_ull(m, "\t" , from_kgid_munged(user_ns, cred->fsgid)); seq_put_decimal_ull(m, "\nFDSize:\t" , max_fds); seq_puts(m, "\nGroups:\t" ); group_info = cred->group_info; for (g = 0 ; g < group_info->ngroups; g++) seq_put_decimal_ull(m, g ? " " : "" , from_kgid_munged(user_ns, group_info->gid[g])); put_cred(cred); seq_putc(m, ' ' ); #ifdef CONFIG_PID_NS seq_puts(m, "\nNStgid:" ); for (g = ns->level; g <= pid->level; g++) seq_put_decimal_ull(m, "\t" , task_tgid_nr_ns(p, pid->numbers[g].ns)); seq_puts(m, "\nNSpid:" ); for (g = ns->level; g <= pid->level; g++) seq_put_decimal_ull(m, "\t" , task_pid_nr_ns(p, pid->numbers[g].ns)); seq_puts(m, "\nNSpgid:" ); for (g = ns->level; g <= pid->level; g++) seq_put_decimal_ull(m, "\t" , task_pgrp_nr_ns(p, pid->numbers[g].ns)); seq_puts(m, "\nNSsid:" ); for (g = ns->level; g <= pid->level; g++) seq_put_decimal_ull(m, "\t" , task_session_nr_ns(p, pid->numbers[g].ns)); #endif seq_putc(m, '\n' ); }
kernel 3.18 task_state 函数构造如下
1
2
3
4
5
6
7
8
9
10
11
12
13
14
15
16
17
18
19
20
21
22
23
24
25
26
27
28
29
30
31
32
33
34
35
36
37
38
39
40
41
42
43
44
45
46
47
48
49
50
51
52
53
54
55
56
57
58
59
60
61
62
static inline void task_state (struct seq_file *m, struct pid_namespace *ns, struct pid *pid, struct task_struct *p) struct user_namespace *user_ns = struct group_info *group_info ; int g; struct fdtable *fdt =NULL ; const struct cred *cred ; pid_t ppid, tpid; rcu_read_lock(); ppid = pid_alive(p) ? task_tgid_nr_ns(rcu_dereference(p->real_parent), ns) : 0 ; tpid = 0 ; if (pid_alive(p)) { struct task_struct *tracer = if (tracer) tpid = task_pid_nr_ns(tracer, ns); } cred = get_task_cred(p); seq_printf(m, "State:\t%s\n" "Tgid:\t%d\n" "Ngid:\t%d\n" "Pid:\t%d\n" "PPid:\t%d\n" "TracerPid:\t%d\n" "Uid:\t%d\t%d\t%d\t%d\n" "Gid:\t%d\t%d\t%d\t%d\n" , get_task_state(p), task_tgid_nr_ns(p, ns), task_numa_group_id(p), pid_nr_ns(pid, ns), ppid, tpid, from_kuid_munged(user_ns, cred->uid), from_kuid_munged(user_ns, cred->euid), from_kuid_munged(user_ns, cred->suid), from_kuid_munged(user_ns, cred->fsuid), from_kgid_munged(user_ns, cred->gid), from_kgid_munged(user_ns, cred->egid), from_kgid_munged(user_ns, cred->sgid), from_kgid_munged(user_ns, cred->fsgid)); task_lock(p); if (p->files) fdt = files_fdtable(p->files); seq_printf(m, "FDSize:\t%d\n" "Groups:\t" , fdt ? fdt->max_fds : 0 ); rcu_read_unlock(); group_info = cred->group_info; task_unlock(p); for (g = 0 ; g < group_info->ngroups; g++) seq_printf(m, "%d " , from_kgid_munged(user_ns, GROUP_AT(group_info, g))); put_cred(cred); seq_putc(m, '\n' ); }
fs/proc/base.c 原始文件 kernel 4.9 proc_pid_wchan 函数构造如下
1
2
3
4
5
6
7
8
9
10
11
12
13
14
15
16
static int proc_pid_wchan (struct seq_file *m, struct pid_namespace *ns, struct pid *pid, struct task_struct *task) unsigned long wchan; char symname[KSYM_NAME_LEN]; wchan = get_wchan(task); if (wchan && ptrace_may_access(task, PTRACE_MODE_READ_FSCREDS) && !lookup_symbol_name(wchan, symname)) seq_printf(m, "%s" , symname); else seq_putc(m, '0' ); return 0 ; }
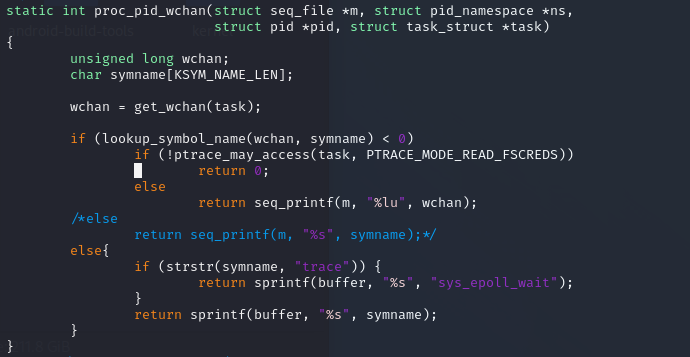
kernel 3.18 proc_pid_wchan 函数构造
1
2
3
4
5
6
7
8
9
10
11
12
13
14
15
16
static int proc_pid_wchan (struct seq_file *m, struct pid_namespace *ns, struct pid *pid, struct task_struct *task) unsigned long wchan; char symname[KSYM_NAME_LEN]; wchan = get_wchan(task); if (lookup_symbol_name(wchan, symname) < 0 ) if (!ptrace_may_access(task, PTRACE_MODE_READ)) return 0 ; else return seq_printf(m, "%lu" , wchan); else return seq_printf(m, "%s" , symname); }
kernel 内核修改 base.c 文件
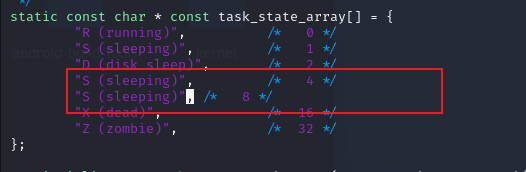
array.c
root 检测绕过 *注:本节所提到的技术均为参考应用root检测通杀篇 所述技术,且最终未能成功实现
android 手机root在渗透环境中是必不可少的一环,同样也是App攻防中的一个点;Magisk可以在Zygisk孵化阶段实现root的屏蔽,已达到在root环境下运行某些特殊App,但是该功能也会彻底的决断root场景下的渗透,类似于frida注入等
虽然定制化的面具也能做到root检测的bypass,不过此阶段既然是研究android kernel,那么本文就从kernel层面去尝试绕过root检测
*本节适用于 kernel 4+,android 11
root检测手段 既然是绕过,那么就要了解一下市面上常见的root检测手段
特征目录扫描 如果看过MobSF的朋友,一定见过其对于root检测扫描的一条规则
1
2
3
4
5
6
7
8
9
10
11
12
13
14
15
16
17
18
19
20
21
22
23
24
25
26
27
28
29
30
31
32
33
34
35
36
37
38
39
40
41
42
43
# MobSF 2.0 { 'desc': 'This App may have root detection capabilities.', 'type': 'string', 'string1': '.contains("test-keys")', 'string2': '/system/app/Superuser.apk', 'string3': 'isDeviceRooted()', 'string4': '/system/bin/failsafe/su', 'string5': '/system/sd/xbin/su', 'string6': '"/system/xbin/which", "su"', 'string7': 'RootTools.isAccessGiven()', 'level': 'good', 'match': 'string_or', 'input_case': 'exact', 'cvss': 0, 'cwe': '', } # MobSF 3.0 - id: android_detect_root message: This App may have root detection capabilities. input_case: exact pattern: - \.contains\("test-keys"\) - \/system\/app\/Superuser.apk - isDeviceRooted\(\) - \/system\/bin\/failsafe\/su - \/system\/bin\/su - \/system\/xbin\/su - \/sbin\/su - \/system\/sd\/xbin\/su - '"\/system\/xbin\/which", "su"' - RootTools\.isAccessGiven\(\) severity: good type: RegexOr metadata: cvss: 0 cwe: '' masvs: resilience-1 owasp-mobile: '' ref: https://github.com/MobSF/owasp-mstg/blob/master/Document/0x05j-Testing-Resiliency-Against-Reverse-Engineering.md#testing-root-detection-mstg-resilience-1
上述的规则罗列出来的各种目录,其实是root的一些特征机制,类似于:magisk、SuperSU
而App在做运行环境检测时,一种方案就是扫描特定的目录,查询是否存在特征文件
root操作执行 App检测root的另一种方案很简单粗暴,那就是自己去主动的root后才能做得操作,例如:
在/data、/system、/etc等目录下尝试新建文件
执行su、find、mount等命令
当然这个只是一种检测方案,在当前的市场监管环境下,这么检测无疑是自杀行为,总不能在《隐私政策》中写:我们为了检测当前App运行环境是否可信,故而申请root权限;监管砍了捏紧了手里的大刀
所以该方案只是本节记录,生产环境中很难遇到这种情况
读取手机状态 前文# Android kernel 入坑之旅 我最后编译的userdebug模式,是一种自带root的系统模式,此种模式下,无需Magisk刷机,自带root功能(只有kernel是userdebug,才能在command命令行下使用adb root)
所以如果App检测root时,只是单一的检测Magisk、SuperSu等root工具的特征,那userdebug自身技能逃避一定的检测规则,故而有了App需要读取手机编译版本、调试状态来判断是否是root
方法其实也很简单,通过读取/system/build.prop文件,获取其中的特定参数值,即可做到最简单的判断
1
2
3
4
5
6
7
8
9
10
11
12
13
14
15
16
17
18
19
20
21
22
23
24
25
26
27
28
29
30
31
32
33
34
35
36
37
38
39
40
41
42
43
44
45
46
47
48
49
50
51
52
53
54
55
56
57
58
59
60
61
62
63
64
65
# Pixel 3XL 为例 crosshatch:/ # cat /system/build.prop # begin common build properties # autogenerated by build/make/tools/buildinfo_common.sh ro.system.build.date=Tue Mar 30 21:41:10 UTC 2021 ro.system.build.date.utc=1617140470 ro.system.build.fingerprint=google/crosshatch/crosshatch:11/RQ2A.210505.002/7246365:user/release-keys ro.system.build.id=RQ2A.210505.002 ro.system.build.tags=release-keys ro.system.build.type=user ro.system.build.version.incremental=7246365 ro.system.build.version.release=11 ro.system.build.version.release_or_codename=11 ro.system.build.version.sdk=30 ro.product.system.brand=google ro.product.system.device=generic ro.product.system.manufacturer=Google ro.product.system.model=mainline ro.product.system.name=mainline # end common build properties # begin build properties # autogenerated by buildinfo.sh ro.build.id=RQ2A.210505.002 ro.build.display.id=RQ2A.210505.002 ro.build.version.incremental=7246365 ro.build.version.sdk=30 ro.build.version.preview_sdk=0 ro.build.version.preview_sdk_fingerprint=REL ro.build.version.codename=REL ro.build.version.all_codenames=REL ro.build.version.release=11 ro.build.version.release_or_codename=11 ro.build.version.security_patch=2021-05-05 ro.build.version.base_os= ro.build.version.min_supported_target_sdk=23 ro.build.date=Tue Mar 30 21:41:10 UTC 2021 ro.build.date.utc=1617140470 ro.build.type=user ro.build.user=android-build ro.build.host=abfarm-00920 ro.build.tags=release-keys ro.build.flavor=crosshatch-user # ro.product.cpu.abi and ro.product.cpu.abi2 are obsolete, # use ro.product.cpu.abilist instead. ro.product.cpu.abi=arm64-v8a ro.product.cpu.abilist=arm64-v8a,armeabi-v7a,armeabi ro.product.cpu.abilist32=armeabi-v7a,armeabi ro.product.cpu.abilist64=arm64-v8a ro.product.locale=en-US ro.wifi.channels= # ro.build.product is obsolete; use ro.product.device ro.build.product=crosshatch # Do not try to parse description or thumbprint ro.build.description=crosshatch-user 11 RQ2A.210505.002 7246365 release-keys # end build properties # # ro.treble.enabled=true net.bt.name=Android crosshatch:/ #
上述查询结果中
ro.system.build.tags【手机编译版本】:release-keys
kernel 内核修改 既然大致知道了厂商检测root的手段,那么本节开始着手去针对性的修改内核来尝试绕过检测
change “su” 最简单的修改就是把su这个明显的特征去掉,
/system/extras/su/Android.mk中的LOCAL_MODULE值为自定义数据
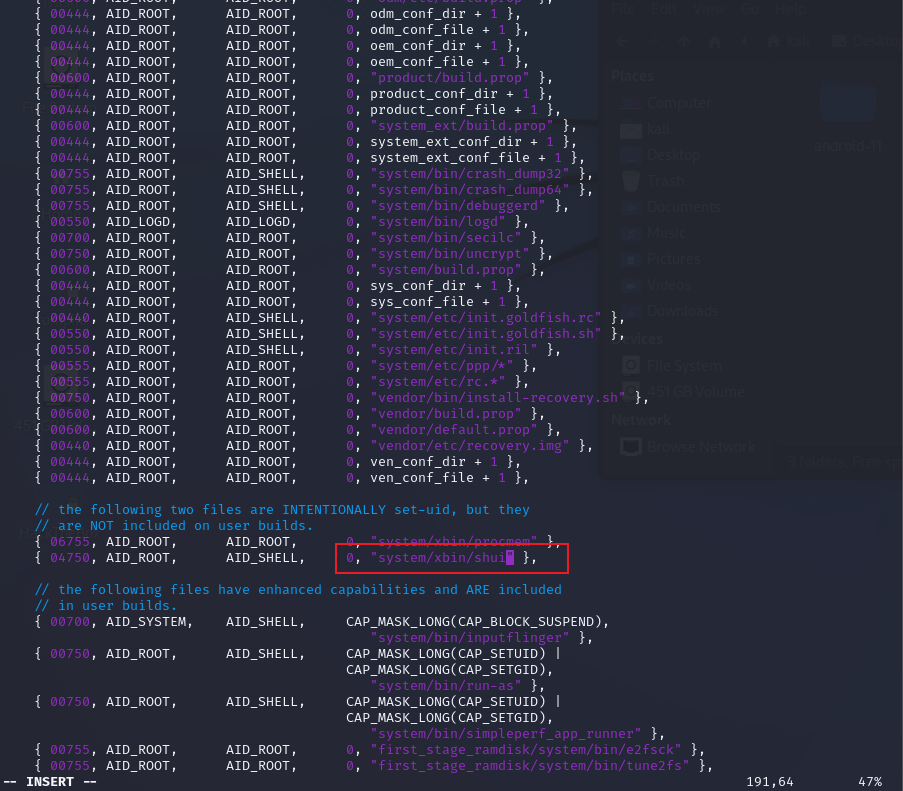
system/core/libcutils/fs_config.cpp中原有的 /system/xbin/su 修改末尾su为刚刚LOCAL_MODULE的值
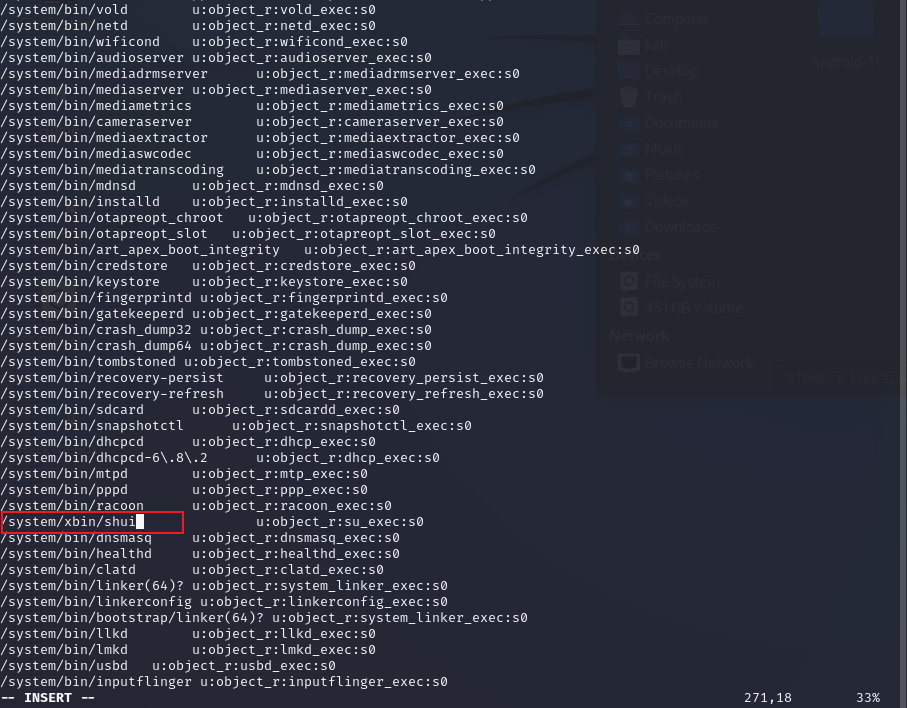
system/sepolicy/private/file_contexts中原有的 /system/xbin/su 修改末尾su为刚刚LOCAL_MODULE的值
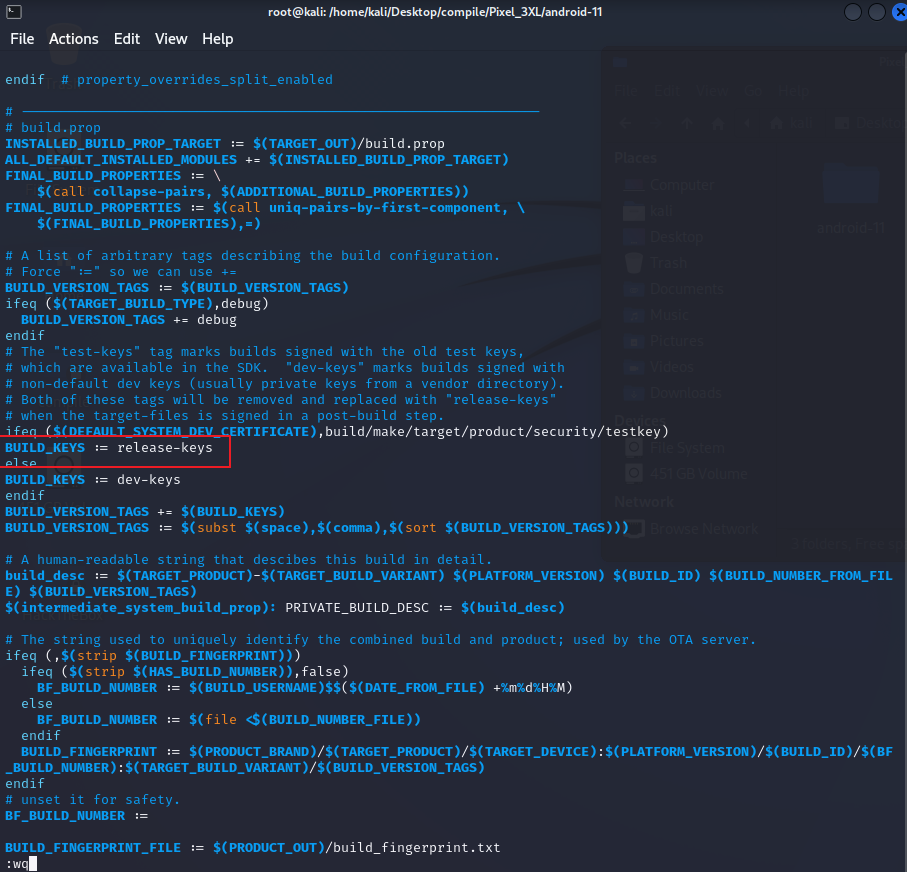
以及编译脚本build/make/tools/buildinfo.sh 中 echo ro.build.tags 的取值为BUILD_VERSION_TAGS,而 BUILD_VERSION_TAGS 该参数的赋值是由 build/core/Makefile 文件负责
此时只需要修改 build/core/Makefile 该文件中的 BUILD_KEYS 值为 release-keys 即可(原值为:test-keys)
change userdebug 截止到目前为止,已经修改了:su、ro.build.tags
接下来需要修改的是内核编译时,userdebug的标识,此标识如果不修改,会导致ro.build.type、ro.build.display.id、ro.build.flavor、ro.build.description、ro.build.fingerprint标签中均带有userdebug,但是release版本对应的上述标签应为user
同理,还是从编译脚本build/make/tools/buildinfo.sh 中 echo 各类标识参数来判断
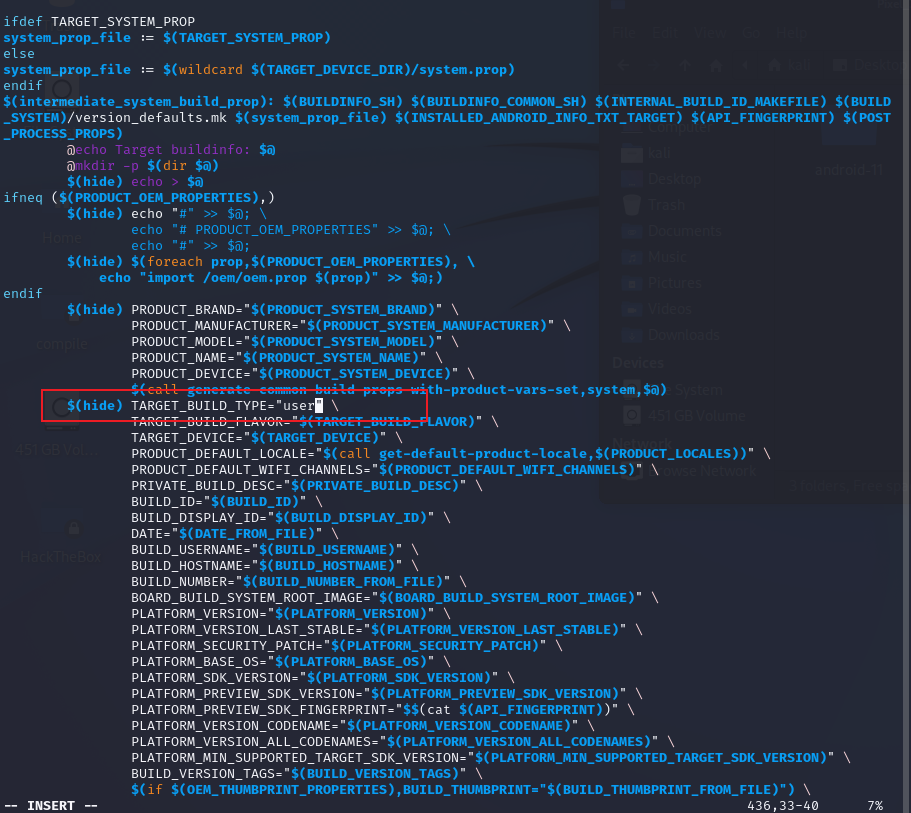
ro.build.type ro.build.type 的取值为 TARGET_BUILD_TYPE,而在Makefile中,存在一个判断逻辑
1 $ (hide) TARGET_BUILD_TYPE = "$TARGET_BUILD_VERIANT "
此判断逻辑会导致原本在Makefile文件中修改的值,需要额外跳转到新的文件修改,所以直接修改该if逻辑,将跳转的值直接该为user
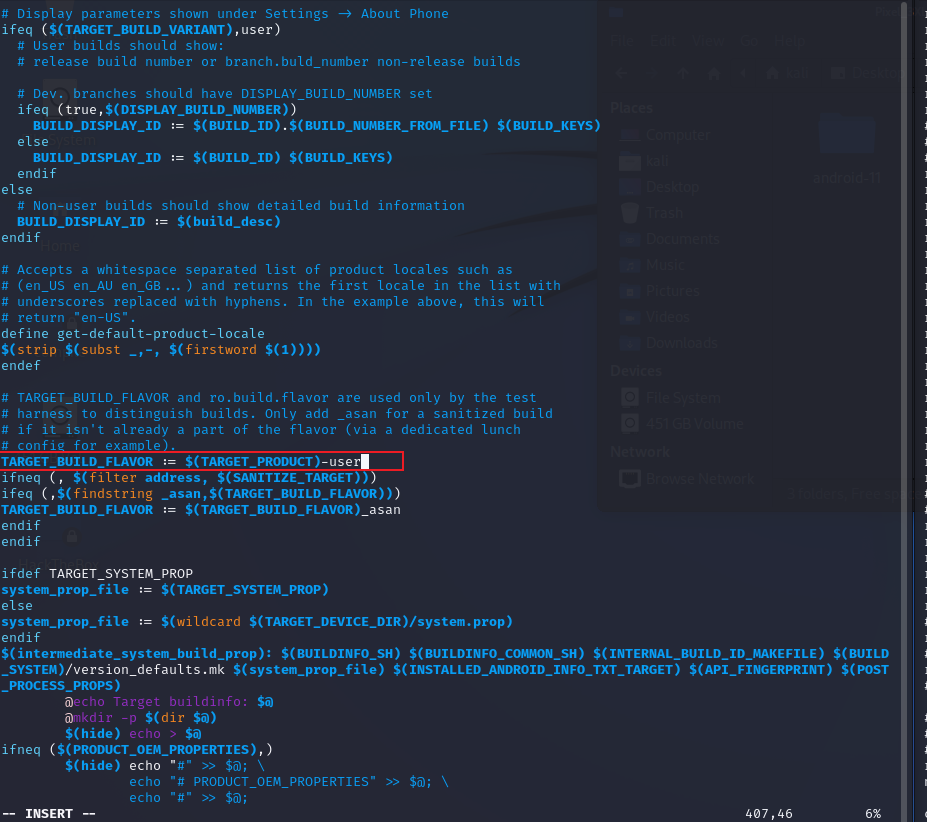
ro.build.flavor ro.build.flavor 的取值为 TARGET_BUILD_FLAVOR,在Makefile中,对该值有如下逻辑
1 TARGET_BUILD_FLAVOR := $(TARGET_PRODUCT)-$(TARGET_BUILD_VARIANT)
咳咳,此处的“-”这个符号不是减号哈,而是一个字符串,得出这个结论的依据可以将目光移到“/system/build.prop”文件中的“ro.build.flavor=crosshatch-user”值,所以在Makefile文件中TARGET_BUILD_FLAVOR 的拼接逻辑只要改成 TARGET_BUILD_FLAVOR := $(TARGET_PRODUCT)-user 即可
残留项目 目前存在俩个ro的残留未作修改:ro.build.description、ro.build.fingerprint
ro.build.description 的取值为 PRIVATE_BUILD_DESC,Makefile中对应的逻辑如下
1
2
3
4
5
6
7
8
9
10
11
## line 118 # A human-readable string that descibes this build in detail. build_desc := $(TARGET_PRODUCT)-$(TARGET_BUILD_VARIANT) $(PLATFORM_VERSION) $(BUILD_ID) $(BUILD_NUMBER) $(BUILD_VERSION_TAGS) $(INSTALLED_BUILD_PROP_TARGET): PRIVATE_BUILD_DESC := $(build_desc) ## line 211 PRIVATE_BUILD_DESC = "($PRIVATE_BUILD_DESC)"
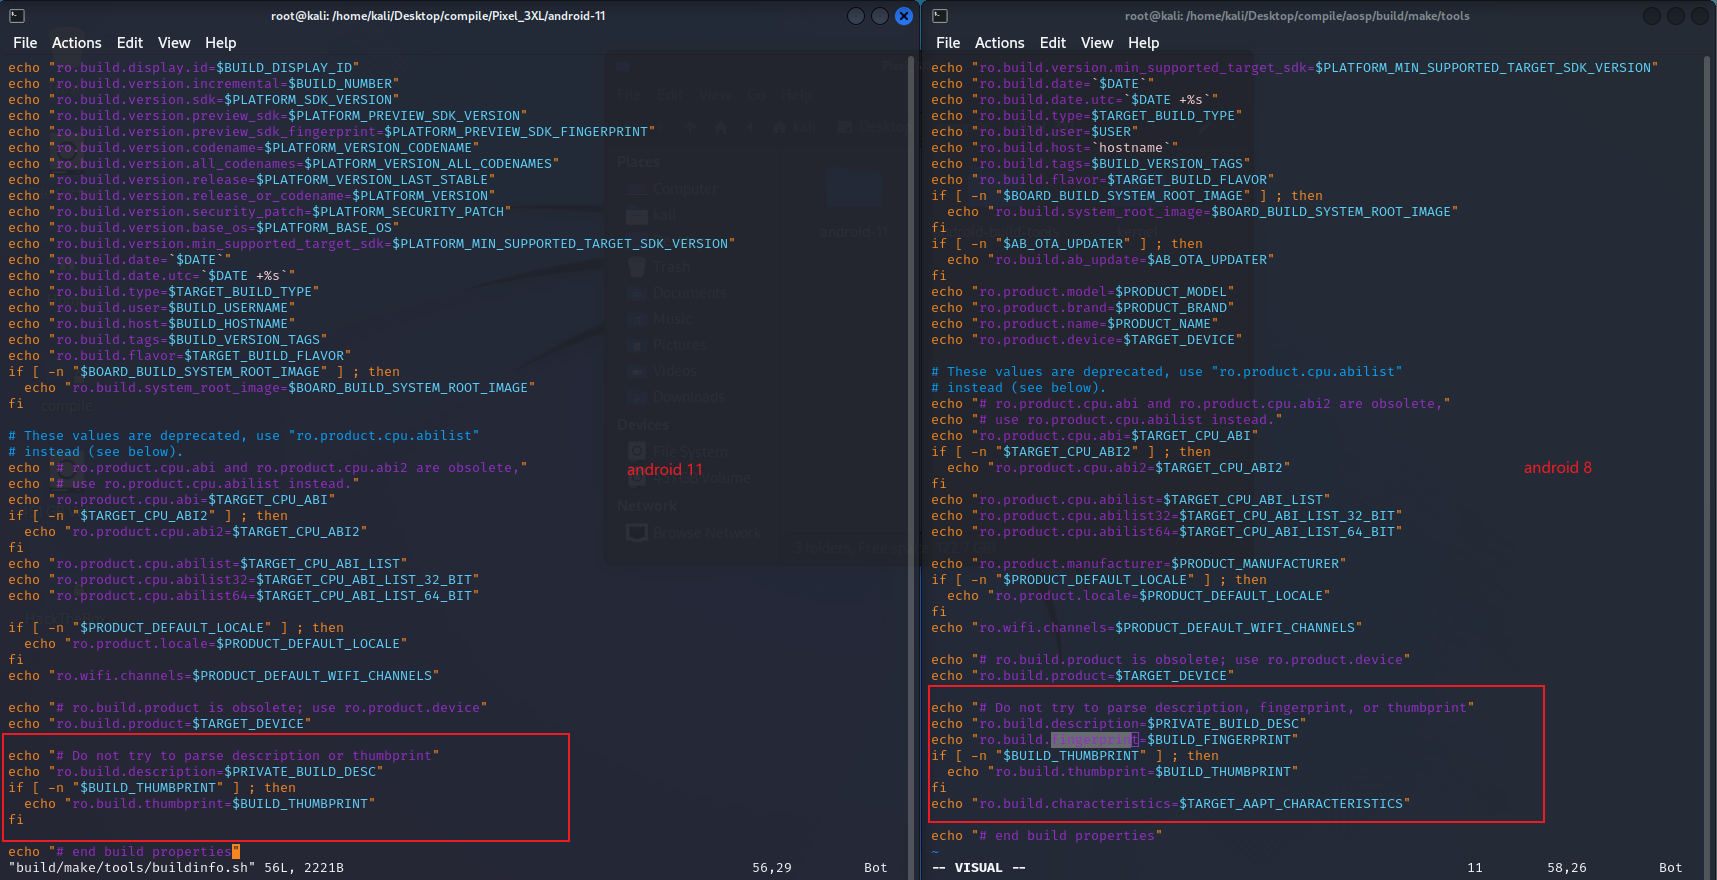
ro.build.fingerprint 则略有不同,fingerprint指纹信息在android 9 之后官方已经将其移除,diff如下
由于涉及到需要修改build_desc的值,而该值可能会涉及到系统文件的读取,所以目前不对这俩个参数最修改,看后续绕过root检测时,是否会受影响
刷机 内核编译 上述修改已经完成,只需要编译android 系统以及内核即可,其实具体的编译可以查看本人之前的博客,不过为了方便,此处再走一遍
kernel 的选择不清楚的,可以看官方文档:builds-kernel ,该文章只限于谷歌系手机
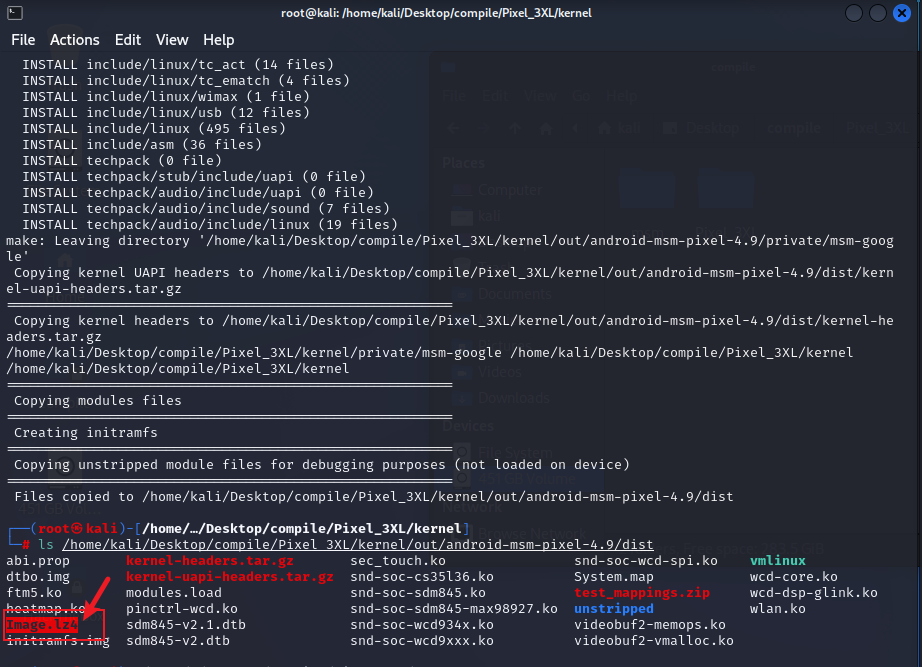
1
2
3
4
5
6
7
8
9
10
11
12
13
14
15
16
17
18
19
20
21
22
23
24
25
26
27
28
29
30
31
# down kernel # 使用国内源 export REPO_URL='https://mirrors.tuna.tsinghua.edu.cn/git/git-repo' # repo 初始化内核 ~/bin/repo init -u https://mirrors.tuna.tsinghua.edu.cn/git/AOSP/kernel/manifest -b android-msm-crosshatch-4.9-android11-qpr2 # repo 内核源码下载 ~/bin/repo sync # 编译工具下载 cd prebuilts git clone https://mirrors.tuna.tsinghua.edu.cn/git/AOSP/kernel/prebuilts/build-tools mv build-tools kernel-build-tools # 引入环境变量 export PATH=/home/kali/Desktop/compile/Pixel_3XL/kernel/prebuilts/kernel-build-tools/linux-x86/bin:$PATH # 切换分支 (cat /proc/version 查看手机内核后,g字母后的数字为本机分支) cd kernel/private/msm-google git checkout 4291d86870f1 # 开始编译 ./build/build.sh # 编译大约20分钟左右,编译结果:Image.lz4 ls /home/kali/Desktop/compile/Pixel_3XL/kernel/out/android-msm-pixel-4.9/dist
内核编译完成,以及结果如下图所示
android 编译 内核编译完成后,将编译结果复制到android源码中,对android进行编译即可
1
2
3
4
5
6
7
8
9
10
11
12
13
14
15
16
17
18
19
20
21
22
# 复制内核 cp /home/kali/Desktop/compile/Pixel_3XL/kernel/out/android-msm-pixel-4.9/dist/Image.lz4 device/google/crosshatch-kernel/Image.lz4 # 下载系统硬件库 - https://developers.google.com/android/drivers;下载之前,切记一定要看一下自己手机的硬件版本,上文中提到的,ro.build.display.id即可 tar -zxvf google_devices-crosshatch-rq3a.211001.001-3dd43cb6.tgz mkdir devices # 硬件库解压后是一个.sh的运行文件 mv extract-google_devices-crosshatch.sh devices # 执行.sh文件后,会生成一个vendor的文件夹,将其复制到android aosp根目录即可 cp -rf vendor /home/kali/Desktop/compile/Pixel_3XL/android-11 # 生成编译环境 source build/envsetup.sh # 选择需要编译的系统 lunch aosp_crosshatch-userdebug # 开始编译 make -j8
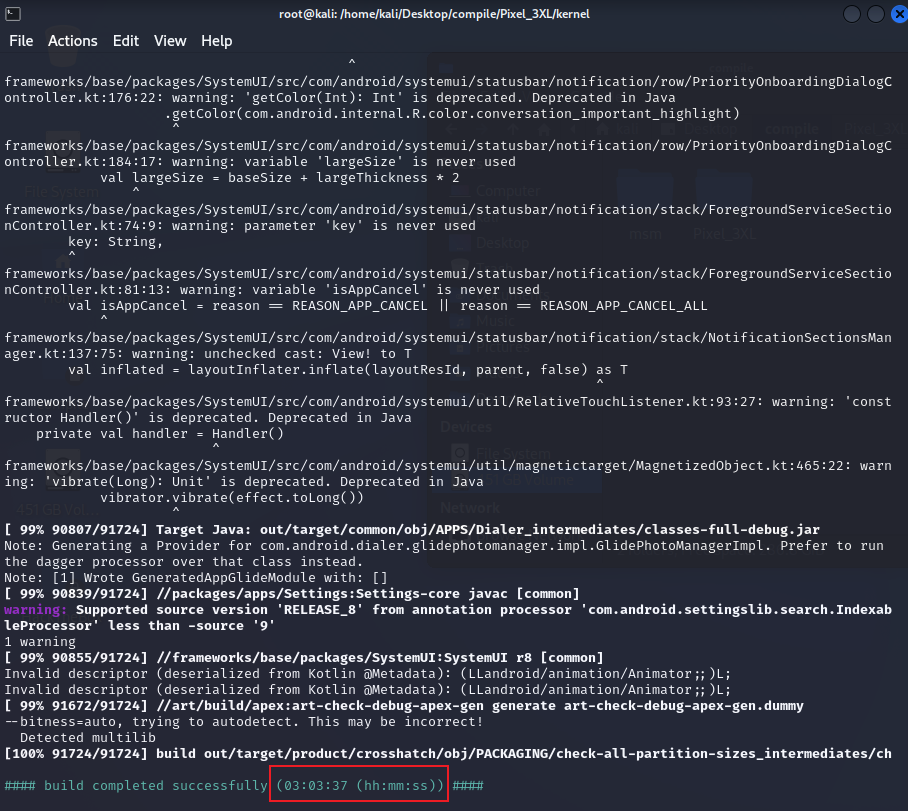
android系统正式开始编译之后,打开一部电影等着吧,目前我自己台式机 3600处理器,需要编译2 - 3个点,诚挚建议,千万别在凌晨编内核,别问,问就是泪
编译成功如下图所示
报错汇总 no valid slot to boot 烧录android boot.img之后,无论是重启还是关机,都会无限制停留在bootloader模式,这种情况根本原因是编译android内核时,并没有把硬件库(vendor)导进去,你可以看一下自己的aosp根本目下是否存在vendor这个文件夹
如果没有,那么按照如下步骤操作即可
1
2
3
4
5
6
7
8
9
10
11
12
13
# 清空原来编译的结果 make clean # 下载系统硬件库 - https://developers.google.com/android/drivers;下载之前,切记一定要看一下自己手机的硬件版本,上文中提到的,ro.build.display.id即可 tar -zxvf google_devices-crosshatch-rq3a.211001.001-3dd43cb6.tgz mkdir devices # 硬件库解压后是一个.sh的运行文件 mv extract-google_devices-crosshatch.sh devices # 执行.sh文件后,会生成一个vendor的文件夹,将其复制到android aosp根目录即可 cp -rf vendor /home/kali/Desktop/compile/Pixel_3XL/android-11
当然,如果是跟着本文刷机这一章节操作的,就不会出现这个问题
总结 本文其实写了俩个目标:frida 检测绕过、root 检测绕过
作为安全对抗的主战场,无疑本文提到的俩种技术已经太过于陈旧,且由于技术的不纯熟,导致撰写本文时,博主自身的技术水准只能做到生硬的套用,无法理解内在的修改逻辑,所以有了如下的错误
1、root检测绕过时,修改build/core/Makefile后导致编译到末尾阶段 “# ninja failed with: exit status 1”

2、root检测绕过时,修改各文件su特征符号后,依旧是编译失败
有错才有进步,还是基础以及技术不够呀,与君共勉吧。
参考文档 Linux /proc目录下和ELF反调试有关的文件
应用root检测通杀篇